Over the past few months, we have focused our posts/attention on one exercise, the two-handed kettlebell swing. Through a series of 4 posts we discussed how to load the posterior chain, increase the chances of gluteal engagement, scapular stability, and finally, proper sequencing. (just scroll down to check them out). While we have received positive feedback about these pieces being helpful for fitness professionals, they weren’t designed to “stand on their own”. It’s time we bring them together. Much of the source material from this piece is from “The Talent Code” by Daniel Coyle.
Building Myelin
Before we get deep into the discussion of myelin, practice and how they’re related lets define myelin.
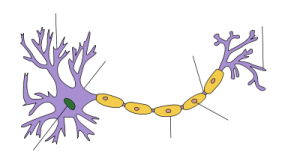
Myelin: an electrically insulating material that forms a layer (myelin sheath,) around the axon of a neuron. The presence of myelin is essential for proper functioning of the nervous system. The main purpose of a myelin layer is to increase the speed at which impulses travel along the myelinated fiber.
Myelination: the process of forming a myelin sheath around a nerve to allow nerve impulses to move more quickly.
Circuits: A grouping of nerve fibers that work simultaneously and/or in series to complete a particular movement or task
Now that we have gotten that out of the way lets talk about the relationship between practice and myelination. New research has revealed that myelin, once considered an inert form of insulation for brain cells, may be the holy grail of acquiring skill. Daniel Coyle has described this new information as a revolution that will forever change the way we view talent and practice. Here’s an excerpt:
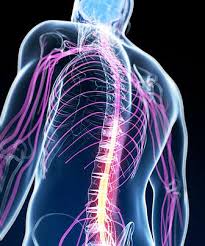
“The revolution is built on three simple facts. (1) Every human movement, thought, or feeling is a precisely timed electric signal traveling through a chain of neurons—a circuit of nerve fibers. (2) Myelin is the insulation that wraps these nerve fibers and increases signal strength, speed, and accuracy. (3) The more we fire a particular circuit, the more myelin optimizes that circuit, and the stronger, faster, and more fluent our movements and thoughts become.”
 When we take part in “deep” (quality, mistake focused) practice of a skill where quality learning occurs (anything from playing the piano to deadlifting) we build myelin. The more deep practice the better and the more mistakes you make (and learn from) the better. The phrase practice makes perfect has been thrown around for generations and while logical, we didn’t have any scientific basis to back this up. What has been discovered is that it’s really deep practice that makes perfect. Myelin grows in direct response to deep (mistake focus practiced). For instance, once a mistake is made, it is more beneficial to stop, evaluate what went wrong, and try to immediately fix it on the next attempt than to plow through and disregard your errors. Twenty minutes of deep practice can easily trump an hour of mindless practice. Daniel Coyle described this process as follows:
“Deep practice feels a bit like exploring a dark and unfamiliar room. You start slowly, you bump into furniture, stop, think, and start again. Slowly, and a little painfully, you explore the space over and over, attending to errors, extending your reach into the room a bit farther each time, building a mental map until you can move through it quickly and intuitively.
As it relates to fitness and high skill work like a kettlebell swing, clean, snatch etc. it’s critical the student takes part in deep practice early on. Being mindful of your position in different parts of a movement and more importantly developing and understanding of what good positioning is… is essential for building myelin.
Layering Skills
Another aspect of building myelin is quality coaching. A master coach, pinpoints flaws and knows how to address each one and in the right order to optimize performance. A quality coach needs to have an abundance of knowledge about their given subject (coaches need to build myelin just like their students). What a quality coach does is recognize exactly what makes their student improve, take them slighlty out of their comfort zone and guide them to the next level. Every student needs to be handled differently because they all respond to different motivations. If you have a vast supply of tools in your coaching toolbox (interpersonally and skill specific) you will be a more effective coach.
 Bringing this back to the kettlebell swing, if you notice your student is not able to grasp the idea of hinging, put the kettlebell down and do a drill that will help them to feel the movement and positions you want them to achieve. For a beginner with little movement skills, this is often all it takes to get them out of their comfort zone. Hinge drills with a piece of PVC pipe and high tension front planks will do much more for this person than swinging a kettlebell. Once they master the hinge and high tension plank have them perform swings to apply this new skill. The coach must then begin to layer in additional skills as needed. Staying with the example of the kettlebell swing these additional skills should include “core firing” / “tightness” at the top of the swing, shoulder packing,
 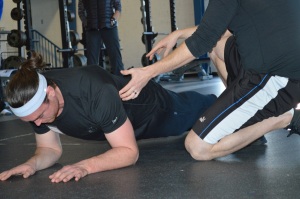 and then sequencing.
Here’s the order we use when layering skills in the kettlebell swing:
- Hinge
- Core Firing / Tightness
- Shoulder Packing
- Sequence
**Please note: Our last 4 Kettlebell Coaching Series Posts addressed how to coach each of these ** View the coaching videos here
Transference
If you want to develop complex skills, the drills used to improve them must have a direct transference to your goals.
Another practice that helps to build myelin, and was briefly mentioned above, is slowing a skill down to a snail’s pace. The above section referenced the hip hinge drill as a tool to help teach the kettlebell swing. This is drill is purposefully performed SLOWLY. It’s important to feel the top and bottom positions in the swing before actually performing the exercise due to the speed of movement. The swing is essentially a hip hinge on steroids. No race car driver begins their career driving at 200 mph! He or she probably started with a bike, than a go-cart or 4-wheeler, then maybe some small dirt track races. They most likely spend at least a decade racing at lower speeds before safely and effectively driving at 200 mph with other cars only inches away. Now you might say, I’ve had my drivers license for 20 years does that mean I can drive a car 200 mph? The obvious answer is no, but the reason why may be cloudy. Driving to work and back has no transference to racing. By law, you are allowed to drive 65 mph on some highways in our area. Therefore, your circuits are only myelinated for driving up to 65 mph. And what happens when someone gets too close to us? We beep our horn at them! We are used to a nice cushion around us. Driving a race car requires much deeper and more specific practice than driving our sedans to a grocery store provides.
As you can tell we are fans of the “Talent Code” and highly recommend all coaches read it. We also feel if you are training others with kettlebells it’s critical to your development as a coach and to the safety of your students you get a coaching focused kettlebell certification. When it comes to teaching bells it’s all about having a systematic well thought out approach.
In our Level 1 Certified Kettlebell Instructor (CKI-1) you will learn:
- Our system for teaching each of the Kettlebell Big 3 (Swing, Goblet Squat, Turkish Get Up)
- How to developing your coach’s eye
- Corrective exercises and coaching drills to “fix”movement flaws,
- Simple yet effective programming strategies.
Visit our homepage to see our upcoming seminar schedule. www.fit-edu.com

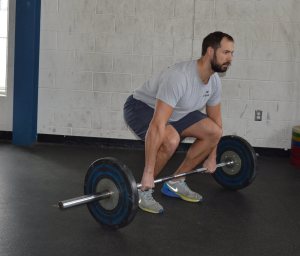
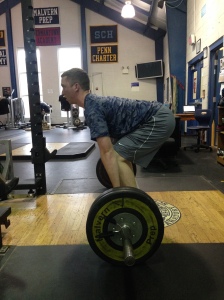
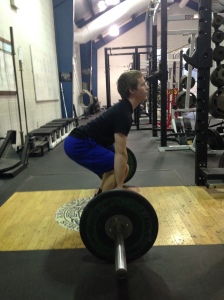
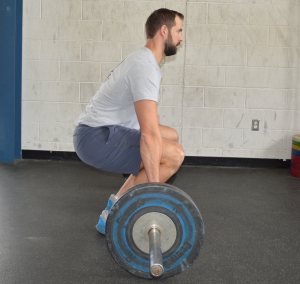 Hips too low – In this position, you’re not deadlifting… You’re squatting. The bar will inevitably scrape this shins… Bad… And you will have less than ideal leverage given your shin and torso angle. Oh yeah… And you’re not actually deadlifting.
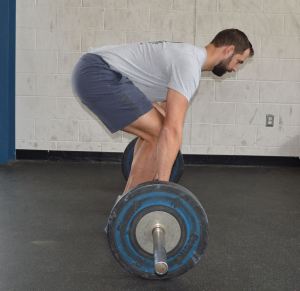 Hips too high – In this position, you have poor leverage (quads cannot make a significant contribution) and you will have no choice but to pull with your “low back” putting significant stress on your lumbar spine.
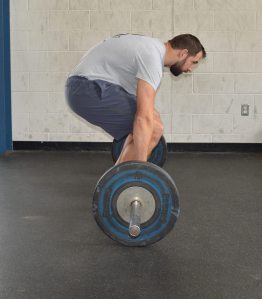

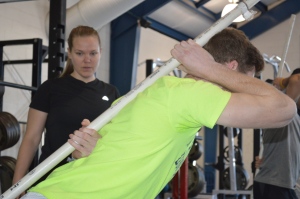
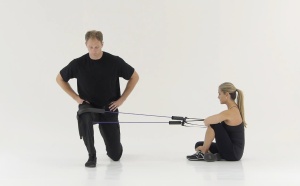 To put it simply, RNT improves flawed movements by employing external resistance which the body must resist and react against. External force should be applied so that it exaggerates the issue. This can be accomplished by pulling with a band OR by physically pushing or pulling a segment of the body. In the picture above the coach is pulling the students right knee into a valgus collapse. The students automatic response will be to push the knee away from the midline.
 Here’s how…If the student’s left knee is going valgus in the squat attach a band to a fixed object to their right side. Have the student arrange the band so it rest is just above the left knee and is pulling the thigh towards the midline (to the right in this case). Make sure there’s enough tension to make the student
 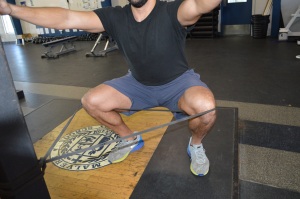 fight the band, but not so much that they can’t maintain the position.
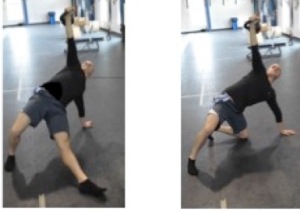
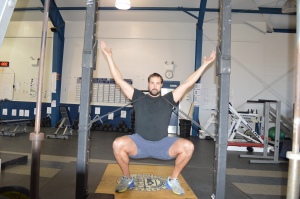 As we discussed in our last post, maintaining a tall torso in the squat can present challenges for many students. For some, RNT is exactly what the doctor ordered. In this case, affix one or two bands in front of the student and relatively low to the ground (this is dependent upon band length and tension). The student should arrange the bands to that they rest on the back of the shoulders thereby pulling their torso into flexion. The natural response should be to get tall. In this case we used two band and Erik assumed a overhead deep squat position. Use the same rule of thumb as above to determine appropriate tension.


 When performing overhead work, such as Turkish Get-Up, Waiter’s Walks, Presses, or Snatches, it’s important to have a neutral spine for a variety of reasons. Maintaining a neutral spine puts the student in an optimal position to brace and maintain stability throughout the exercise. If the student has limited shoulder flexion, getting the working arm(s) into the optimal position without compromising joint position elsewhere is impossible. Specifically, extension of the spine, lateral shifting and/or rotation of the pelvis, and flexion of the elbow are all common compensations. This will logically put high levels of stress on the elbow or somewhere in the spine increasing the chances of injury.